DVD Creator Tutorial
Part 1: How to convert video to DVD
DVD Creator software make it easy for you to create home DVDs from various videos. It can burn DVDs from any popular videos like MP4, MOV, M4V, WMV, AVI, MKV, FLV, M2TS, etc. Beside those, it can also convert video files as ISO files.
This guide is going to teach you how to convert video to DVD for watching on DVD players.
Step1: Download and install DVD Creator on computer.
Step2: Load video file to DVD Creator
Click "Add Video"/"Add Folder" option under the "File" pull-down menu, or just click the "Video Plus" image button in the main interface to load video for burning.
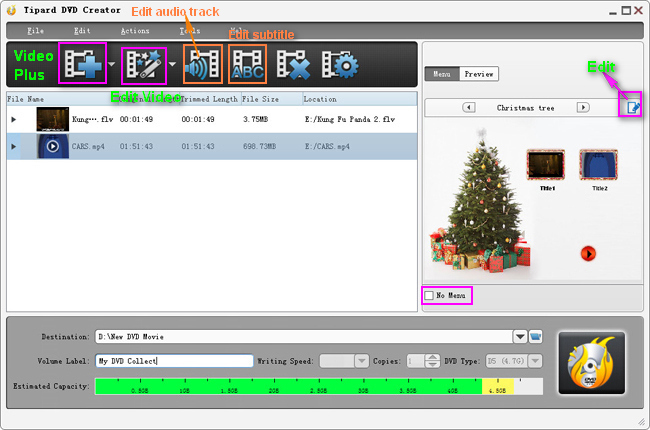
Step3: Make DIY play menu
Click "Edit" Image Button on the upper right corner of the main interface displayed above, then you can create DIY play menu on the popped-up "Edit Menu" Window.
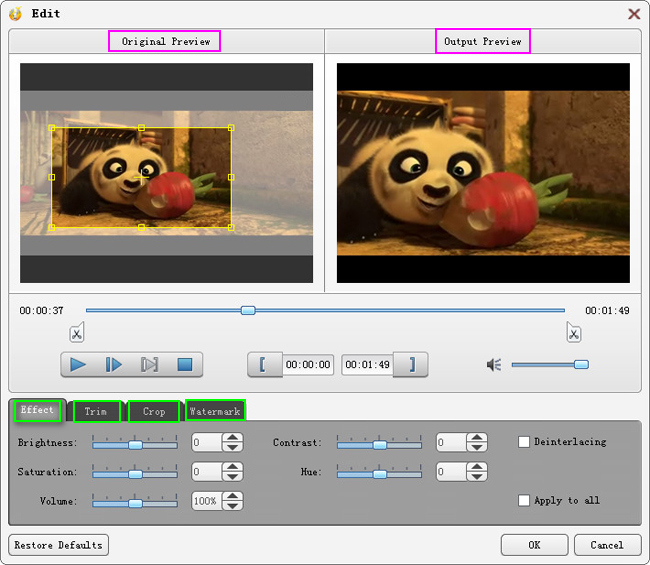
Step4: Edit video file
You are allowed to trim, crop, watermark video and adjust the Brightness, Contrast, Saturation, Hue and Volume of video file just by clicking "Edit Video" pull-down Image Button on the upper left corner of the main interface, or you can just clicking one of the four options under the "Actions" pull-down menu to start your editing.
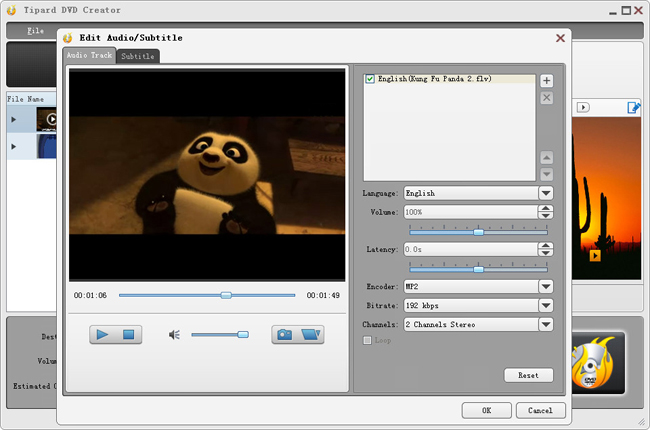
Step5: Edit and adjust audio tracks and subtitles
Click "Edit audio track" Image Button or "Edit subtitle" Image Button on the upper left corner of the main interface to open "Edit Audio/Subtitle" Window to edit or add any audio tracks or subtitles.
Step6: Create DVD file
"Save as DVD Folder" and "Save as ISO" two options are available for you to select from the Pull-down Menu of "Destination" Column. If you want to create the DVD file just choose "Save as DVD Folder" and create a new folder and name it. Then you can input any content to be the DVD Volume Label. Finally, hit the "Output DVD Folder" Image Button to create a DVD file from your favorite videos.


 BD/DVD Tools for Win
 Blu-ray Toolkit
 DVD Software Toolkit Platinum
 Blu-ray converter
 DVD Ripper
 Blu-ray Player
 Blu-ray Copy
 DVD Creator
 Total Converter Platinum
 Video Converter Platinum
 MXF Converter
 M2TS Converter
 Video Tools for Mac
 iPhone transfer platinum
 iPad transfer platinum
 iPod transfer platinum
 PDF Converter Platinum
 PDF to Word Converter
 PDF ePub Converter
 PDF Converter for Mac